
Wiper Connector Identification Made Simple
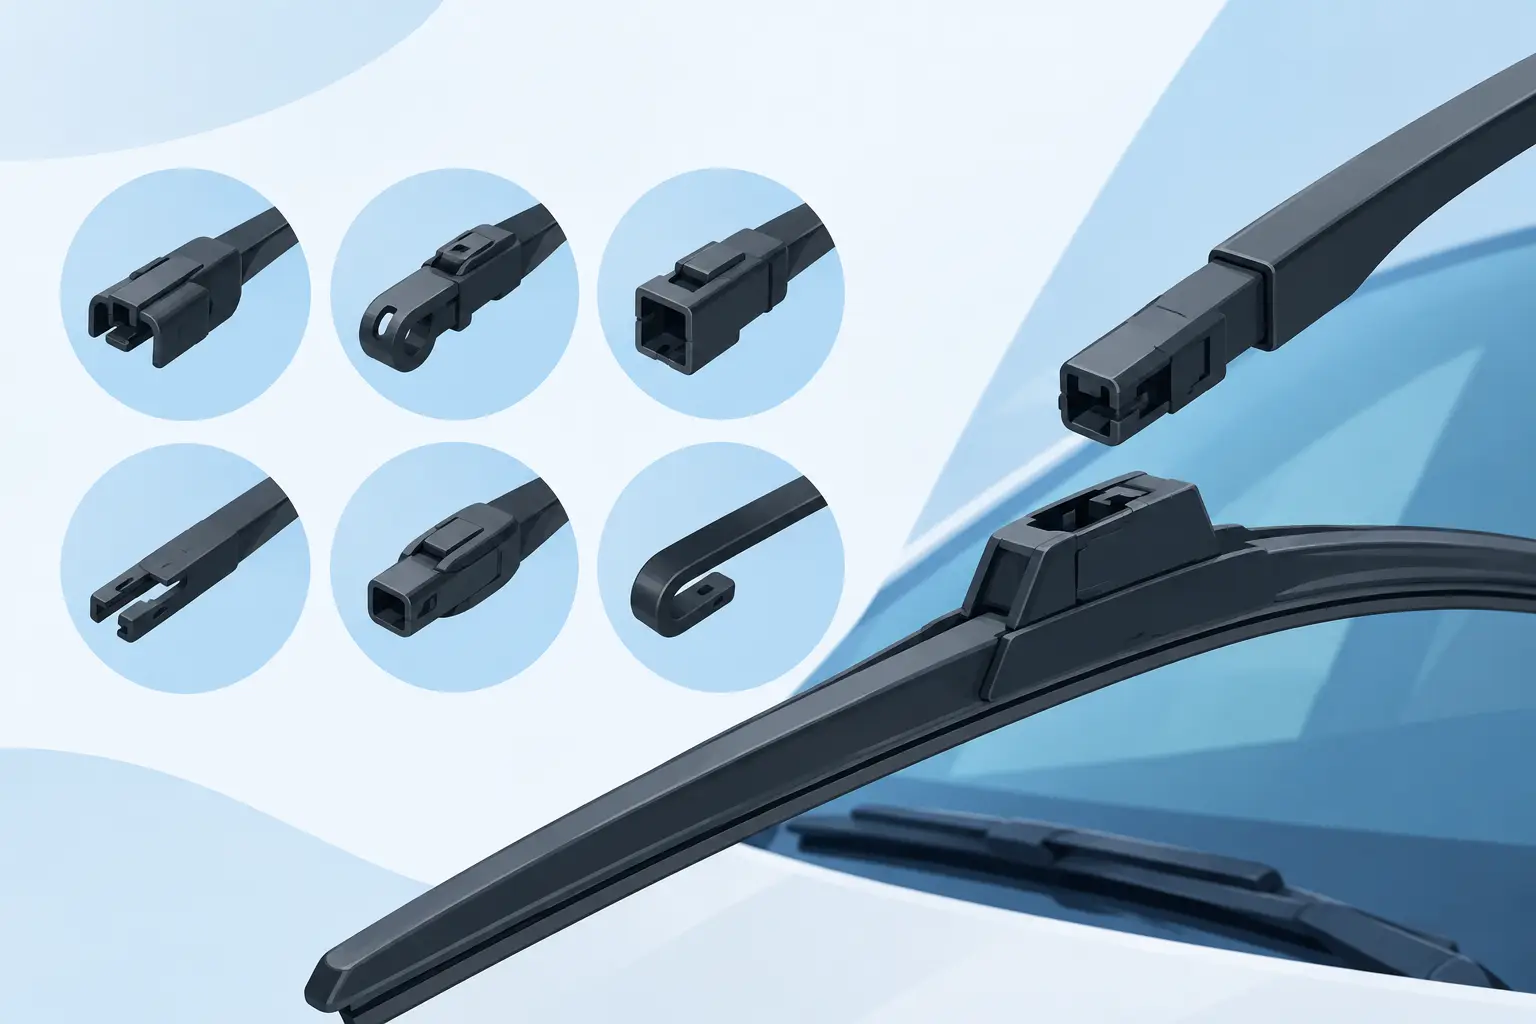
A wiper blade can look right in the box and still be completely wrong for your car. That is why wiper connector identification matters. The connector is the small fitting where the blade attaches to the wiper arm, and getting it wrong can mean a loose blade, a frustrating install, or no fit at all when rain is already on the windscreen.
The good news is that you do not need to be a mechanic to get it right. With a quick look at your existing wiper arm and the right vehicle details, you can replace tired, streaky blades with confidence. No squeaks. No streaks. Just clear views.
Why the connector matters as much as blade length
Many drivers start by measuring the old blade. Length does matter, but it is only half the fitment picture. Two blades can be the same length and use entirely different connections. If the adaptor does not match the arm, the blade may not lock in place, sit correctly on the windscreen, or move safely through its full sweep.
A correctly matched connector keeps the blade secure and aligned. That helps the rubber edge maintain even pressure across the glass, which is what reduces smearing, chatter and missed patches in heavy rain. It also makes replacement quicker. A pre-fit adaptor designed for your vehicle should click into place without improvised fixes, excess force or a trip to the workshop.
This is especially useful on newer cars, SUVs and imported vehicles, where wiper arms are often more specialised than the traditional hook-style arm found on many older models.
Wiper connector identification: start with the arm
Before ordering, lift one wiper arm away from the windscreen and look at the point where the blade joins it. Do this gently and only as far as the arm naturally allows. Avoid letting the bare metal arm snap back onto the glass – it can crack a windscreen surprisingly easily. A folded towel placed on the windscreen beneath the arm adds useful protection while you inspect it.
Most passenger vehicles use one of several common arm styles:
- J-hook or U-hook: The arm curves over like a hook. This is common on many older and mainstream vehicles.
- Pinch tab: The connection has tabs on the sides that you squeeze or press to release the blade.
- Push button: A small button or tab releases the blade from a flatter arm connection.
- Bayonet or side-lock: The arm slides into the blade adaptor and locks from the side or end.
- Top-lock: The blade connects from above, usually on a flatter, more modern wiper arm.
You do not need to memorise these names before buying. They are useful for understanding what you are looking at, but a vehicle-specific finder is more reliable than making a decision from a quick visual match. Some connectors look almost identical until you try to install them.
Check the old blade, not just the arm
Your existing blade can offer clues, particularly if it is still the original style or has been fitted correctly before. Look for a release tab, a sliding cover or a small locking button near the centre adaptor. Take a photo on your mobile before removing it if you are unsure. That gives you a reference for the fitting position and orientation later.
Be aware that a previous owner, workshop or retailer may have fitted a universal blade with a multi-adaptor. In that case, the connector on the old blade may not represent the car’s original fitment. Your make, model and year remain the most dependable starting point.
The easiest way to avoid an adaptor mismatch
The simplest approach is to select wipers by vehicle, not by guesswork. Enter the exact make, model and year, then check the body style or variant if prompted. A hatch, sedan, wagon and SUV version of the same model name can sometimes use different blade lengths or rear wiper fittings.
For the best match, have your registration details or vehicle information handy. Pay attention to the model year, as a redesign can change the wiper arm even when the vehicle name stays the same. This is common around changeover years, where two versions may be on Australian roads at once.
At Auto Cross, the vehicle finder is designed to take the compatibility work out of the process. Instead of sorting through generic adaptors at an auto parts shelf, you can choose a blade kit matched to your vehicle and receive the correct fitting arrangement. Perfect fit, guaranteed, is far more useful than a packet that says it suits “most cars”.
Front and rear wipers are not always the same story
Front blades usually come as a pair, but they are often different lengths. The driver’s side is commonly longer to clear the main field of vision, while the passenger side is shorter to suit the windscreen shape. Swapping them around can cause overlap, poor coverage or contact with the windscreen trim.
Rear wipers deserve separate attention. Many rear blades use a different connector from the front pair, and the arm may be hidden under a plastic cover or sit close to the glass. Do not assume a spare front adaptor will fit the rear. If your rear screen is streaking, choose a blade specifically listed for the rear position on your vehicle.
The same principle applies to speciality vehicles. Utes, European models, hybrids and vehicles with highly curved windscreens may use fittings or blade profiles that differ from similar-looking cars. It depends on the exact vehicle, not the badge alone.
What a correct fit should look and feel like
Once the new blade is installed, it should sit squarely on the arm with no obvious sideways movement at the connector. Give it a light tug to confirm it has locked in. You should not be able to pull it free without releasing the locking mechanism.
Before driving, lower the arm carefully and run the wipers with washer fluid. Listen for clicking, knocking or scraping. Watch the blade travel across the glass and check that it does not lift at either end, strike the windscreen edge or leave a large unwiped section.
A little water left at the outer edge can be normal depending on the windscreen shape, but repeated streaks through your main line of sight are not. If a new blade smears, first clean the windscreen thoroughly. Road film, tree sap, dust and oily residue can make even a quality blade perform poorly.
Common fitting mistakes to avoid
The most common mistake is forcing a connector because it nearly fits. Stop if the blade does not slide in smoothly or click into place with reasonable pressure. Forcing it can damage the adaptor, bend the wiper arm or leave the blade insecure.
Another issue is leaving protective plastic on the rubber wiping edge. Some blades arrive with a narrow cover to protect the rubber during transport. Remove it before use. Also check that the rubber edge is not twisted after installation, especially if the blade has been handled roughly or stored in a hot car.
Finally, replace blades in pairs at the front where possible. One worn blade and one fresh blade can create uneven clearing and make the difference in performance more noticeable. If the rear blade is worn too, replacing it at the same time means clearer vision all around when conditions turn wet.
When it is time to replace your blades
Wiper blades do not always fail all at once. Often, the first signs are faint lines on the glass, a judder across a dry patch, squeaking, or a hazy film left after each pass. Australian sun is tough on rubber, and heat can harden or split the wiping edge long before the metal frame looks worn.
Check your blades every few months and replace them when performance drops, rather than waiting for a proper downpour. Clean, quiet wiping is a small maintenance job with a big effect on visibility – particularly during night driving, sudden summer storms and long regional trips.
Take a minute to confirm your make, model and year before ordering, let the vehicle match guide handle the connector details, and enjoy the simple part: fitting fresh blades and seeing the road clearly again.
Posts Widget



Copyright 2026 © AutoCross. | Sitemap
